Showing posts with label Scrapbook Pages. Show all posts

8.12.2015

Stampin' Up! Artisan Blog Hop-Project Life

Hello! Welcome back to another Stampin Up! Artisan Design Team Blog Hop!

For this week's hop we are featuring the Moments Like These Project Life bundle! It comes with everything you need (the card collection, embellishment collection and the stamp set) to create some fabulous pocket scrapbook pages at a 15% discount!

I decided to use the bundle to create a vacation scrapbook of our trip to Oregon last summer, check out one of the layouts:

 Let's head over to Cindy's and see what she created with this fun bundle!
http://nutmegcreations.blogspot.ca/2015/08/artisan-aug-2.html

5.02.2015

Happy National Scrapbook Day!

Happy National Scrapbook Day everyone! I hope you are all enjoying your day. . . and possibly doing some scrapbooking?! I wish I was spending my NSD scrapbooking away, but instead I am spending the entire day out in the yard doing spring cleanup. . .FINALLY! Yes, I have been putting it off, and yes I can be a bit of a procrastinator at times. Whaaa?! Me?! Yes.

Gage has been home from school the past three days with allergies/asthma. Poor little guy gets coughing so hard he gags himself and throws up. It has not been fun for either of us. I don't do barf well. We have been doing nebulizer treatments which has helped, but as soon as he gets outside, or too excited, he starts coughing/gagging again. On a positive note, I have also had the past couple of days off work! YAY! . . . until Monday when I have to get all caught up.

Yesterday I was able to squeeze in some crafting time, and was so excited to get a scrapbook page done! Except that I had creative block! I used to be a BIG time scrapbooker, like about 8 years ago before I had Gage, now I am lucky if I get one or two pages done a year! Horrible, I know! I have not been good at all about scrabooking this amazing little boy's life. I keep saying I will, but then I get busy doing other things. But, I am committed to getting some albums done. As I sat down and chose a photo I wanted to create a layout with, I had a very difficult time coming up with any ideas. It was as if I had forgotten how to scrapbook! Yikes! Luckily, dear sweet Mrs. Cathy Caines came to my rescue! She is an amazing scrapbooker, and she was so kind as to offer me some suggestions on my page. Actually, I won't lie, I basically had to start over because what I had was hideous! But after some much needed suggestions and changes, I was finally able to complete my project!
 
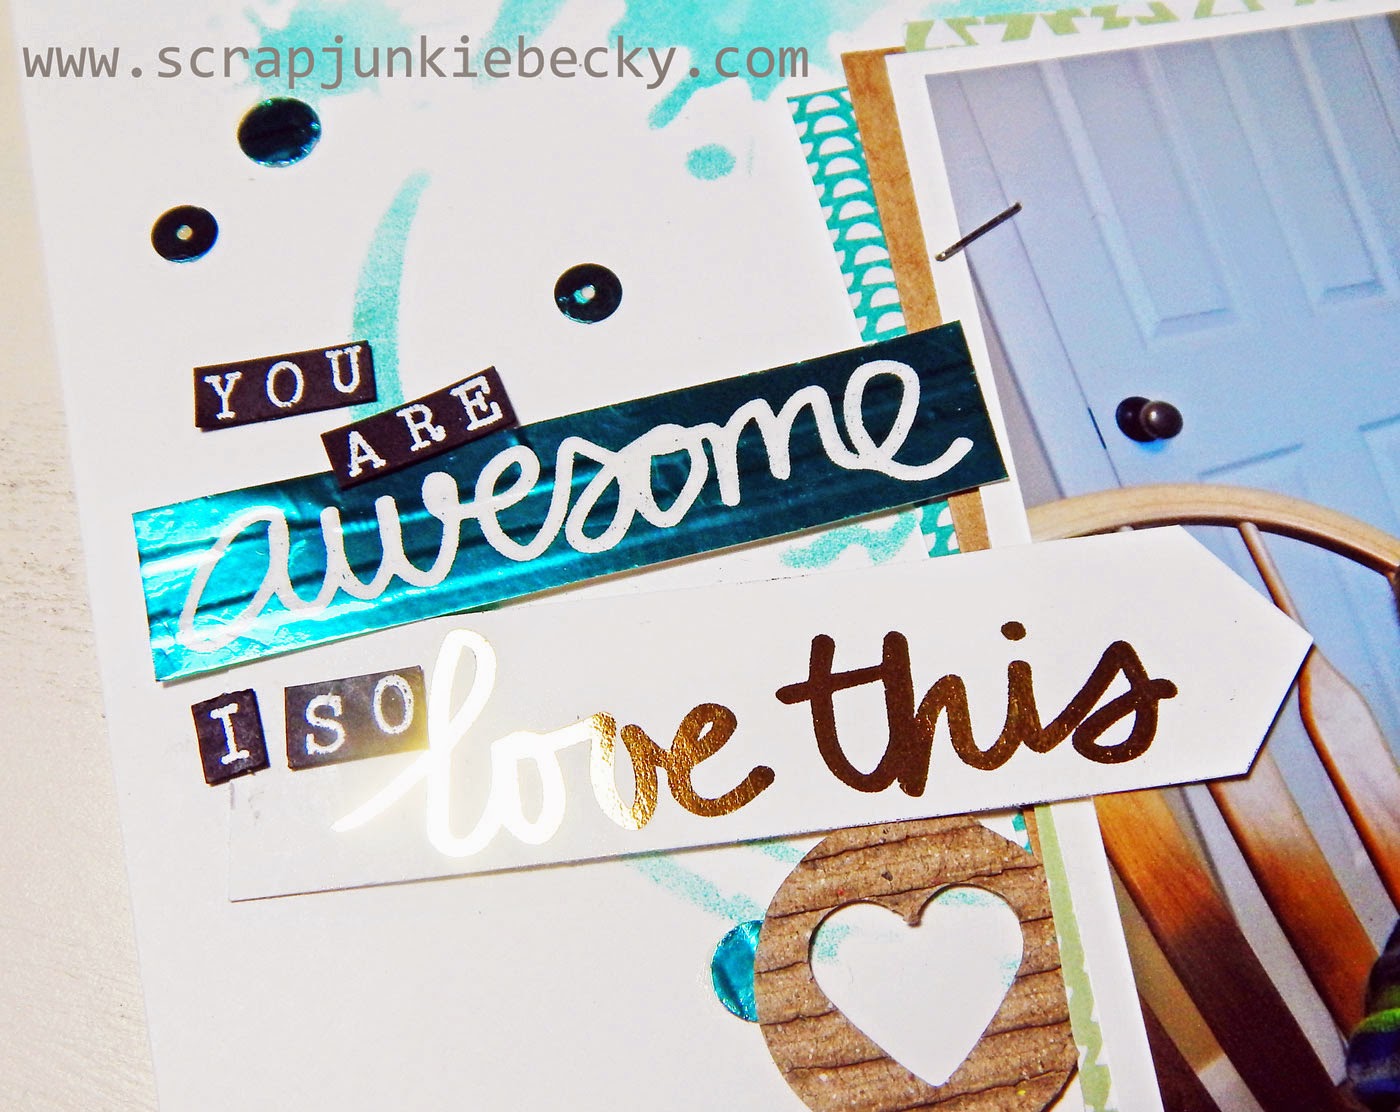
I have been obsessed lately with my new Heidi Swapp Minc foiling machine, and have been foiling everything! It was hard to get the light to show the shimmer and shine of these fun elements. . . I am also a horrible photographer. . . but they are so shiny and fun! I am like a deer in headlights looking at all the fun shiny things! The "awesome" is actually the negative of one of the phrases (from Stampin' Up!s Moments Ago digital download) that I foiled, but it was just so cool I couldn't bring myself to throw it away! So, I trimmed it and stuck it on my page!


The fun corrugated accents are from Stampin' Up!s Playground Accessory Kit (on sale now), and the journal quote is from the coordinating Playground Card Collection (also on sale). I matted the photo with some Confetti Celebration DSP (yes, also on sale)!!

And then of course, I upcycled a cardboard box by tearing off pieces and stapling them to the top and bottoms of my page. Sigh. . . one page done. 5000 more to do! I do plan on doing more pocket pages, as those seem to be MUCH quicker and easier for me. . . but I still want a few traditional pages, and could certainly use the practice as I have gotten quite rusty!

Thanks for stopping by, I hope you all enjoy your day!

Don't forget to check out my BOGO sale! Earn FREE products with every $10 purchase! This week is the last week I am offering BOGO! Order {here} using hostess code: N6KRE3B9 then check out my freebies list {here} to select your FREE items! **click on the BOGO badge for more details on the sale. 
http://scrapjunkie-becky.blogspot.com/2015/04/time-for-goodbyes.html

5.13.2014

AWW-A Traditional Take. . .

Welcome back to another Artisan Wednesday WOW blog hop!

I am  seriously falling. . . deeply. . . in love. . . with Project Life ® by Stampin' Up! ®

The simple thing is an adjustment in my crafting style that I have been trying to work on lately, but I like the quick "git'r'done" thought process behind Project Life.

I decided to whip out a traditional scrapbook page using the PL products. . . 


Yup! Git'r'done!

The photos were taken with my cell phone, and weren't the best quality to scrapbook with. . . but I could not pass on documenting this moment! Luckily PL makes it super easy to scrapbook everyday pictures that may not be the best in quality, but still share a fabulous moment in time!

Let's head In The Cat Cave and see what Cathy has to share!

http://www.inthecatcave.com/2014/05/aww-may-2.html

Supplies used: Alphabet Rotary Stamp (*available June 1st); Everyday Adventure Project Life Card Collection; Everyday Adventure Project Life Accessory Pack; Bermuda Bay, Strawberry Slush, and Crushed Curry Cardstock; Bermuda Bay ink pad; Build a Banner Simply Created Kit (stencil); Itty Bitty Accents Punch Pack (*available June 1st); Project Life Corner Punch; Basic Black 3/4" Chevron Ribbon; Gold Sequin Trim; Linen Thread; Sponge Dauber; needle and thread.

5.06.2014

Project Life ® by Stampin' Up! ®


Welcome to this week's Artisan Wednesday WOW Blog Hop! Our super fun buttons for this month were created by my MDS super hero Jeanna Bohanon, aren't they bright and fun?! Wanna try your hand at creating digitally? Be sure to check out MyDigitalStudio.net for inspiration and get your FREE MDS 30-day trial today!

If you haven't heard, Stampin Up! has teamed up with Becky Higgins to offer new Project Life products in exclusive Stampin' Up! colors! I admit, I heard about PL a few years ago but wasn't sure how it would fit into my scrapbooking style. . . However, after giving Project Life ® by Stampin' Up! ® a try, I am completely addicted! Project Life very well could replace my traditional scrapbooking style! Well, maybe not completely replace. . . but I LOVE the fact that I can get an entire page done in just 5 minutes! SERIOUSLY! This will be a HUGE time saver for me, as I usually take a minimum of 30 minutes to create a traditional page, not to mention the time consumed by trying to come up with an idea for a traditional layout! With PL the work is done for you! The pocket pages create the layout, so no time needed trying to come up with your own, and the per-printed journaling cards and embellishments take the time out of creating your own! With Project Life ® by Stampin' Up! ®, I simply slide my photos in the pockets, slide in a few printed cards along with my journaling cards, maybe add a few embellishments, and Viola! PAGE DONE! Couldn't be easier, or quicker!


Want more tips on how to get started with Project Life? Check out this blog post by Stampin' Up! Concept Artist Arika Bauer, she'll blow you away with how easy, yet still amazing,  Project Life ® by Stampin' Up! ® is!

Be sure to continue on the hop to see what the other Artisans have created with this fun new product! Let's head In The Cat Cave and see what gorgeous creation Cathy has to share, she is seriously THE scrapbooking QUEEN, I can't wait to see what she has created with the new PL!

http://www.inthecatcave.com/2014/05/aww-may-1.html

Supplies used:

4.01.2014

Hello, Sailor - AWW

Welcome back to another Artisan Wednesday WOW blog hop! This month's badges were made by the ever so cute (and apparently my doppelganger) Cindy Schuster!

I am doing great with my resolution of making at least one scrapbook page each month. Maybe next month I may step it up and start doing 2 a month!? . . . maybe. . .

This page was super fun for me! I have been loving Jane Lee's hand drawn doodles on her cards lately, and wanted to try it out. . . mine aren't so cute, but it was still fun to try! For this page I started by painting some white craft paint on my High Tide DSP. I then used my Pool Party ink refill and Aqua Painter to paint some bubbles on it, though I probably should have waited until the paint was dried completely! I had a bit of a smear. . . luckily it was easily covered up by the photos! Then I totally ruined about 4 markers trying to do my doodles! Again, I should have waited until the paint was COMPLETELY dry, but I was having so much fun that I didn't want to wait! I was in some sort of mad creative zone, or. . .  something. Anyway, my suggestion is that if you decide to try this, save the sacrifice of your markers and wait until your paint dries. It turned out super cute none-the-less, but then most of my goofy bubbles got covered up with my junk. Having fun is what it is all about, though, isn't it?! Check out the page:


I LOVE these photos of my boys! Ever since Gage was little, he was always copying just about everything Nate did, notice they are sitting in the same exact position?! LOVE IT! He was about 2-1/2 years old in this pic. . . so cute! We had spent the day at Hyrum Dam just chillin', and Nate would take Gage out in his "little yellow boat" ie floaty. Watching the two of them together makes my heart melt!


And for you card makers, I did make a matching card too! Now, I probably should have bought the digital download and used my silhouette to cut out the anchors on the page and card. . . but, I like to do things the more difficult way, and sometimes I actually just like making my own patterns and fussy cutting things out. . . but you can always do things a bit more simple!


Don't forget to keep hopping and see what the other Artisans have to share! You'll be inspired for sure! Next stop? Cathy. . . I think she is up to something. . . In The Cat Cave. . . Let's go spy on her!

http://www.inthecatcave.com/2014/04/aww-1.html

Supplies used: Hello Sailor stamp set; High Tide DSP; Whisper White, Smoky Slate, and Pacific Point cardstock; Pool Party, Smoky Slate, Pacific Point, and Summer Starfruit Stampin' Write Markers; Pool Party Ink Refill; Pacific Point 1-1/4" Striped Grosgrain, Summer Starfruit 1-1/4" Striped Grosgrain, and 1-1/4" Burlap Ribbon; Silver Baker's Twine; Linen Thread; Brights Designer Buttons; Essentials Wood Elements; Aqua Painter; On Film Framelits dies; Arrows Embossing Folder; Labels Collection Framelits dies; other: white craft paint and black sharpie.

3.18.2014

Artisan Wednesday WOW: A Look Back. . .

Welcome back to another Artisan Wednesday WOW blog hop! Today we are going to share in more detail our facebook projects.

Lately I have been looking back through some old photos and scrapbooks. It is always neat to see how things transform and change. People, places, styles, and even how we perceive the world around us. . . it all changes given time. Yet, there are always things that find their way back. . . like VELLUM! HAHAHA! I know this started out serious, but I SERIOUSLY was laughing at some of the scrapbook pages that I created back in the 90's when neon and vellum were so IN! (Don't worry, I won't torture you by subjecting your eyes to them!) Funny, BOTH vellum and neon are making a HUGE comeback! Though I have not yet been able to embrace the return of neon, I love that I am starting to use up my stash of vellum that I have been hoarding for the last 20 years! WOW, am I that old?! Forget I said that!

I also came across this beautiful photo of my mother taken on her honeymoon in Vancouver B.C. and decided to create a page to compliment the photo.


I wanted to mimic the soft blossoms in the picture, and what better way to do that than with vellum? I used the Pansy Punch to punch out several vellum flowers, then stitched them to the page using a curved pattern from the oval in the Occasions Paper-Peircing Pack. Yes, it is a lot of hand stitching! My hands were sure to let me know just how awful that was! But, I would do it again if I had to because I LOVE the result!


Oh, and of course I HAD to try the faux dip-dye technique that Donna Griffith showed us a few weeks back. . . check out her how-to video:


I used Donna's idea to dip-dye my tag and Tea Lace Paper Doily.


I saved myself the time of actually watercoloring the flowers by simply stamping them on the Watercolor Wonder DSP. Yes, again, cutting out the flower images after stamping them took some time. . . but well worth it!

Don't have a stash of vellum you've been hoarding for the last 20 years? Don't worry! It is still available to purchase!

Now, let's head In The Cat Cave!

http://www.inthecatcave.com/2014/03/aww-mar-3.html

Supplies used: Happy Watercolor stamp set; Whisper White and Vellum cardstock; Gold Foil Sheet; Canvas Creations; Watercolor Wonder DSP; Stazon Jet Black ink pad; Crisp Cantaloupe and Daffodil Delight Stampin' Write Markers; Crisp Cantaloupe ink refill; Tea Lace Paper Doilies; Natural Chevron Ribbon; Gold Sequin Trim; Gold Baker's Twine; Vintage Faceted Buttons; Scallops Embossing Folder; Pansy Punch; Hearts Collection Framelits; Occasions Paper-Piercing Pack; Paper-Piercing Tool; Stampin' Pierce Mat; Aqua Painter; Stampin' Spritzer; needle and thread.

2.25.2014

Artisan Wednesday WOW: Love You to the Moon!

Welcome back to another Artisan Wednesday WOW blog hop! Are you enjoying yourself so far? I tell ya, these ladies never cease to amaze me! We hope to continue to inspire you, so be sure to stop by each of the 10 Artisan's blogs!

When junior was a baby, I wanted him to be reminded everyday just how much he is loved. We had some pictures of us holding him that we hung on the wall in his room, and a large vinyl phrase up above them that read “Love you to the moon and back again.” Everyday I would tell him this (which has over time expanded to him saying “I love you to the moon and back down to the earth and around and around and back up to the moon.” and I have expanded by responding with “well, I love you to the moon and back down then back up to the moon infinity times”). This has now become our “thing” to express to each other just how much we love each other, and that we will never stop.

 As you can imagine, I was quite giddy when I saw the Love You to The Moon stamp set in the Occasions Catalog. I just KNEW that I needed that set! Lucky me it showed up in our box this month! YAY! Here is the card I created to surprise my special little guy with some day (probably on a day when we are at odds and he is screaming at the top of his lungs how much he hates me, and that I am not his “real” mom. . . to which I will respond, “so, I am a fake mom? Huh. . . I sure feel real.” Then I will leave this card somewhere I know he will find, and it will tell him that no matter how angry he is at me, or how frustrated with him I get, I still love him to the moon and back again infinity times!

  
One thing I have been horrible at (besides apparently being a “real” mom), is keeping up on junior's scrapbook. My new years resolution (though late) is to get caught up and keep up. Scrapbooks are a great way to document a loved one's life, and in junior's case, to tell him his story and how we became a family. They are also a great expression of love. I wanted to use this sentiment, since it is our “thing”, and use pictures of us doing what we love to do most. . . just hangin' out, chatting about nonsense stuff, and being goofy! I actually created the page first, and then “lifted” the idea to create the coordinating card.


I know the page is a bit “involved”, (I don't plan on all of my pages being so intense, other wise I may never get caught up!) but I wanted this one to be special. You could very easily copy and simplify it like my friend and fellow demonstrator Janice Barlow did. She simplified my original idea by leaving some of the extra elements off and turned it into a two-page spread. Check out her rendition:

 
I was happy to be of inspiration to her, and I am flattered that she loved my idea enough to recreate it as a project for her stamp club members. Now they will have a fun page to add their precious little ones on too!

Ready to see what Cathy has to share? I always love her projects, plus I get a kick out of her verbiage! I can be in a rotten mood, then read one of her blog posts, and totally be laughing! Gotta love her! Let's head on In the Cat Cave!

http://www.inthecatcave.com/2014/02/aww-feb-4.html


Supplies used: Love You to the Moon and Simply Stars stamp sets; So Saffron, Night of Navy, Smokey Slate, Coastal Cabana, Whisper White, and Silver Glimmer cardstock; Kaleidoscope DSP; So Saffron, Crushed Curry, and Smokey Slate ink pads; Crushed Curry, Coastal Cabana, Night of Navy, Smokey Slate, and Basic Black Stampin' Write Markers; Blender Pens; Vanilla Shimmer Smooch Spritz; Crushed Curry 3/4” Chevron Ribbon; Gold Baker's Twine; Basic Metal Buttons; Gold Sequin Trim; Arrows Textured Embossing Folder; other: needle and thread.

2.03.2014

So Happy Together!

One of the first product suites that caught my eye from the Occasions Catalog (and maybe it was because it was on the first page?) was the Retro Fresh Suite featuring the Peachy Keen stamp set. I loved all of the possibilities with this suite, and I especially love all of the coordinating products, especially the Retro Fresh Journaling Tags! These tags offer so many options to create cards, use for quick project life pages, and more! Plus, with coordinating Retro Fresh products like DSP, stickers, ans washi tape, you're sure to create a perfectly coordinated project!

Check out this project scrapbook page I created with the suite:

 photos taken by Mindy Bywater Bywater Photography
Yes Retro Fresh Suite, you + me are happy together! . . . me and my hubby are happy together too! :)

Don't forget to check out the whole team's projects!
(search Leadership Display on their blogs)
Becky Cowley- you are here!
Cathy Caines - In The Cat Cave
Connie Collins - Constantly Stamping
Erica Cerwin - Pink Buckaroos
Jane Lee - Jane Lee's Cards
Jeanna Bohanon - Stamp Time Somewhere
Cindy Schuster - Nutmeg Creations
Jennifer Timko - Stampin' on the Fly
Alanna Wharf - Sleepless Stamper
Mercedes Weber - Paper Creations by Mercedes
 
Supplies used: Peachy Keen Stamp Set; Retro Fresh DSP; Very Vanilla, Baked Brown Sugar, Crisp Cantaloupe, Tangerine Tango, and Coastal Cabana cardstock;  Crisp Cantaloupe, Tangerine Tango, and Coastal Cabana ink pads; Crips Cantaloupe ink refill; Retro Fresh Journaling Tags; *Sweet Sorbet Accessory Kit; Retro Fresh Washi Tape; Very Vintage Buttons; Houndstooth embossing folder; Small Heart, Itty Bitty Shapes Punch Pack, and Scallop Edge Border punches.

*items are only available to earn FREE during Sale-A-Bration.

1.30.2014

You Can Never Have Too Much Happy!


It's true, you really never can have too much happy! In a world so full of turmoil, "happy" is about the only thing that keeps me sane! There have been so many amazing life lessons that I have learned from my little boy, including the importance of just being happy. . . taking in every moment with all your heart, and finding joy in every moment and in everything, no matter how menial it may seem. My little guy is FULL of character and emotion, and each one is magnified by 100! When he is happy, it encases my entire soul and I feel as if I am shining from the inside out, I LOVE experiencing his happy with him. . .


I have scrapbooked these pics of junior's first day of preschool before, in a digital form, but the page I created was more about my feelings of sending him off on his own for the first time and how it affected me. . . this time I wanted to capture how Gage was feeling, because as I was crying and feeling some separation anxiety, he was being silly, giggling, laughing, and eagerly anticipating his first day of school.


For this page I used the Petal Parade set which is now available to earn for FREE with a $50 purchase! YES, Sale-A-Bration started yesterday, so don't miss out on the chance to earn free product!

Now, back to the page. . . you may be wondering where I go the black rhinestones and Vintage Faceted Buttons from? My secret is that I just colored them with a black Sharpie! *Be sure to use a permanent ink when coloring the rhinestones and buttons, otherwise it will just rub off!

Don't forget to check out the whole team's projects!
(search Leadership Display on their blogs)
Becky Cowley- you are here!
Cathy Caines - In The Cat Cave
Connie Collins - Constantly Stamping
Erica Cerwin - Pink Buckaroos
Jane Lee - Jane Lee's Cards
Jeanna Bohanon - Stamp Time Somewhere
Cindy Schuster - Nutmeg Creations
Jennifer Timko - Stampin' on the Fly
Alanna Wharf - Sleepless Stamper
Mercedes Weber - Paper Creations by Mercedes
Supplies used: *Petal Parade and Yippee-Skippee stamp sets; Natural Composition DSP; Basic Black, Whisper White, Pool Party, Coastal Cabana, and Bermuda Bay cardstock; Whisper White, Coastal Cabana, Basic Black, and Bermuda Bay ink pads; Coastal Cabana and Basic Black Stampin' Write Markers; *Sweet Sorbet Accessory Pack;  Basic Jewels Rhinestones; Vintage Faceted Buttons, Epic Day This & That Washi Tape; *Decorative Dots embossing folder; Chevron Border Punch; 1 1/4" Circle Punch; other: needle, thread, and Black Sharpie.

*items are only available to earn FREE during Sale-A-Bration.

1.23.2014

Someone Who Changes You

This page was the very first project I created in my mind for the Leadership Display boards. As soon as I saw this sentiment from the See Ya Later stamp set (which can be earned FREE during Sale-A-Bration), I instantly knew I would be creating a page regarding the moment I met my son, and how far we have come on our journey together.

My son was first place into my arms when he was just 2 days old. My life was forever changed. I fell in love at that very moment, but at the same time I was so very scared about the unknown. . .

After many years of fertility issues, and finally accepting the reality that I would not be able to bear children on my own, my husband and I knew that we would grow our family through adoption. After prayerful thought and consideration, we decided that we would adopt through the Fost-Adopt program. We had helped a few children out, providing them a safe environment in which their needs were met while the work was being done to reunite them with their biological parents. But with my son, it was different. From the moment we met, I knew deep down that he was mine, yet I couldn't know for sure what would happen. . . if we would get to keep him. . . or if he would, in the end, return home to his biological parents. With very conflicting feelings, it was hard for me. I knew that I would love this precious little boy with all my heart, mind, and soul, yet part of me was hesitant to let myself believe that he would be mine forever. I needed to protect myself from the heartache and loss for when this boy who was mine would be going home to his biological parents. It is hard to describe all of the feelings attached to this little guy, but my life WAS forever changed from the moment I laid eyes on him and the RFC placed him in my arms. An instantaneous flood of emotions came over me. . . love. . . excitement. . . nervousness. . . anxiety. . . fear. . . desire to make sure that no matter what was to happen, this precious spirit would know that he is loved.


It was a long, emotionally hard road (not just for our little family, but for the case workers, GAs, extended family, and biological family involved as well). Finally, after 11 months of loving this little guy and working with the bio parents to try and reunite, the Judge ultimately decided it just wasn't possible or in the best interest for this little guy to return to his bio parents. By 18 months, the adoption was finalized with no more possibility of appeals, and he was officially a Cowley! Who knew that one little soul could change the lives of so many people, and have such a profound impact on our sense of love!

Our boy is now six years old, and we have had quite the journey! At just 6 months old, the doctors came to the conclusion that the trauma this little baby endured while in utero (as well as some very traumatic things that occurred during visits with the bio father) had had a huge impact on his development, and that he would need extra help. Weekly Physical and Occupational Therapy, as well as a scheduled regimen of sensory play have helped him out tremendously! Though he was diagnosed as being on the Autism Scale and having Sensory Processing Disorder, his progress has been truly amazing, and without a trained eye you would now never know his hardships! I cannot even begin to imagine what life would be like for this little guy had he not had so many people in his life advocating for him.

Though it is a very tough process, this Fost-Adopt thing. . . crazy us! We have decided to go through the Fost-Adopt program again! Scarey, but also very excited about the possibilities too!

Don't forget to check out the whole team's projects!
(search Leadership Display on their blogs)
Becky Cowley- you are here!
Cathy Caines - In The Cat Cave
Connie Collins - Constantly Stamping
Erica Cerwin - Pink Buckaroos
Jane Lee - Jane Lee's Cards
Jeanna Bohanon - Stamp Time Somewhere
Cindy Schuster - Nutmeg Creations
Jennifer Timko - Stampin' on the Fly
Alanna Wharf - Sleepless Stamper
Mercedes Weber - Paper Creations by Mercedes

Supplies used: See Ya Later and Banner Blast stamp sets; Sweet Sorbet DSP; Pool Party, Crisp Cantaloupe, Summer Starfruit, Calypso Coral, and Whisper White cardstock;  Pool Party, Crisp Cantaloupe, Summer Starfruit, Calypso Coral, and Whisper White ink pads; Pool Party, Crisp Cantaloupe, and Basic Black Stampin' Write Markers; Tea Lace Paper Doilies; Pool Party 3/8" Ruffle Stretch Trim; Sweet Sorbet Accessory Pack; Vintage Faceted Buttons; Hung Up Cute Clips; Chalk Marker; Hearts Collection Framelites Dies; Banner Punch; Decorative Dots Embossing Folder; Expression Thinlits Dies; Feathered Woodcuts MDS download; other: Silhouette.

1.17.2014

More Geometrical!


Today I am sharing another Leadership Sample. Although I am not too happy with the page itself, I had to share it because I LOVE the photo of my little boy! It captures all of his quirkiness and the everyday silly things that we enjoy!

For those of you who are new to my blog and haven't yet gotten to know me and my family, my son was diagnosed a while back with Sensory Processing Disorder and is on the Autism Spectrum scale. We are CONSTANTLY working with trying to do lots of tactile activities with him and one of his more favorites is playdoh. Just a few years ago he wouldn't even touch the stuff, and now he loves to play with it! On this particular day we were making hamburgers and fries with his little playdoh food factory. Next thing I know he is smashing the "hamburger patty" on his head and laughing! I got a kick out of it! (I was actually quite surprised that he allowed the playdoh to touch his face. . . not very characteristic of him.) I love moments like these when my little boy is so open to experience the world around him without having a meltdown, YAY!

This page is actually an 8" X 8", and I used the Geometrical stamp set from the 2014 Occasions Catalog. At the time I created this page I did not have the Triangle Punch, but boy would it have been handy! Did you know that quite a few stamp sets in the Occasions Catalog can be bundle together with coordinating punches and dies to make your crafting much easier, plus you get a 15% discount?! Be sure to check out the Geomatrical bundle which includes the triangle punch and save yourself from hand cutting them out. . .


Be sure to check back for more display projects!

Don't forget to check out the whole team's projects!
(search Leadership Display on their blogs)
Becky Cowley- you are here!
Cathy Caines - In The Cat Cave
Connie Collins - Constantly Stamping
Erica Cerwin - Pink Buckaroos
Jane Lee - Jane Lee's Cards
Jeanna Bohanon - Stamp Time Somewhere
Cindy Schuster - Nutmeg Creations
Jennifer Timko - Stampin' on the Fly
Alanna Wharf - Sleepless Stamper
Mercedes Weber - Paper Creations by Mercedes
Supplies used: Geometrical stamp set; Whisper White, Crushed Curry, Bermuda Bay, Gumball Green, and Smoky Slate cardstock; Basic Black, Crushed Curry, Bermuda Bay, Gumball Green, and Smoky Slate ink pads; Whisper White Baker's Twine; Chevron Embossing Folder; *Triangle punch (not used, but would have been much easier!); *Angled Tag Topper Punch; stapler.

10.15.2013

Artisan Wedensday WOW!

Welcome to another edition of the Artisan Wednesday WOW blog hop! Be sure to check back each Wednesday to see what all 10 members of the 2013 Artisan Design Team have created.

It is not often I do an all digital scrapbook page. I LOVE My Digital Studio, but I usually use it to make elements for hybrid pages because I like the actual hands on process that comes with traditional scrapbooking. I think I can count on one hand how many all digital scrapbook pages I have created. However when you don't have a lot of time, digital scrapbooking is a heaven send! Plus, MDS has been updated with some great new features to make the process so quick you could whip up an album in no time at all! I have been busy the last couple of weeks and haven't had much stamp time, but thanks to MDS I was able to create this fun page in a snap, check it:

Let's head over to The Cat Cave and see what Cathy has been up to, shall we?
Supplies used: (All supplies are digital elements in MDS) Harvest of Thanks digital brush set and ink splatters; Every Body's Business and Sweater Weather digital DSP; Feathered Woodcuts, Dotted Scallop Ribbon, and Flag digital punches; Neutral Delightful Digital Tape; Mis-Stitched digital stitching; Tea Lace digital doilies; digital Baker's Twine box; Sara's Sequins.

8.27.2013

Artisan Wednesday WOW


Welcome back to another edition of Artisan Wednesday WOW! I hope you are enjoying all of the creative inspiration this year's design team has to offer. Be sure to click on the "next" button at the end of each post so you can make sure you visit all 10 blogs. Trust me, you won't want to miss out on what these very talented ladies have to share!

Today I am sharing a scrapbook page that I created featuring the Vanilla Coaster Board, a stencil (made from the coaster board), and a sheet of Canvas Creations. I started by making a grid on a piece of the coaster board, which I used as a template to draw my herringbone or chevron pattern. I then cut out each of the patterns with my craft knife.

 Don't throw the cut-outs away! They can be used as fun embellishments on your page or a card! Once I had my custom stencil complete, I used my Stampin' Spritzer (filled with alcohol and Cajun Craze ink refill) to create the pattern on the canvas sheet. You can choose to keep the custom stencil to use over and over again, but I liked the way my stencil looked after I used it, so I decided to incorporate it into my page as well as the cut-outs. I don't usually hand write anything on my scrapbook pages, as I don't care for my handwriting, but I did choose to on this page. This page was meant to showcase the special connection between my husband and my son, and how much my son looks up to his dad. The journaling comes from the book My Daddy and Me by Tina Macnaughton, one of Gage's favorites that we picked out as a gift for his daddy.

 
Notice the chevron embossed pattern? This is done by folding my paper into thirds, then putting it the Stylish Stripes embossing folder and sending it through the big shot. Now this will make it very tight, so be sure that you are using the very base of the platform and not a tab, and also don't fold the cardstock more than three times or it will be too thick and you could damage your folder and/or big shot! Does that all make sense? Hope so!

Be sure to continue on the hop by heading over to Cathy's blog and see what she's up to!


supplies used: My Digital Studio; Rise & Shine digital download; Tape It stamp set; Cajun Craze ink Refill; Basic Black Stampin' Write Marker; Epic Day This & That Designer Series Paper; Crumb Cake, Very Vanilla, and Cajun Craze cardstock; Vanilla Coaster Board; Canvas Creations; Naturals Designer Buttons; Stampin' Spritzer; Stylish Stripes embossing folder; Big shot; Sticky Strip; Stampin' Dimensionals; Snail Glue; other: Silhouette Cameo; craft knife.